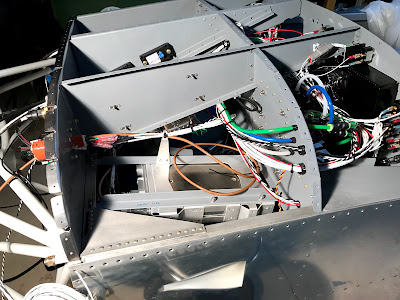
Labels

Wednesday, January 31, 2018

More elevator controls and BRS parachute rack!: 6 hours

The following work was done over two days:

  • I spent about an hour getting the washers and the rod end bearing for the forward push pull tube into the forward control column. Very frustrating but worked out well. Dental floss and tape helped me finally get everything together!
  • Permanently bolted the aft push pull tube and the servo to the bell crank.
  • Cleaned up angles and canister for the BRS parachute system.
  • Installed the angles for the BRS canister and put the canister in place. The canister will not get bolted in until the actual parachute and rocket is installed - hopefully this summer!
  • Installed the aft tunnel cover and connected the flap position sensor. I also had to do a slight reroute on the flap wiring to clear the cover.
  • Installed the roll linkage for the two control sticks. This took a while to get everything lined up. This also included the tabs and springs for the roll trim system.


Stick linkage for roll - the tab is for the roll trim:

Sticks are linked up in roll:

Flap position sensor done:

Parachute canister ready for loading:


Aft push pull tube and pitch servo complete:

The washers for the control column and the forward push pull tube have been the hardest to work with so far:

Monday, January 29, 2018

Elevator controls: 4 hours


  • Adjusted stick grips, applied loc tite and torqued set screws.
  • Positioned forward push pull tube in tunnel.
  • Clamped elevator in neutral position and temporarily attached aft push pull tube.
  • Adjusted aft tube to bring the bell crank vertical.
  • Adjusted auto pilot pitch servo linkage for bell crank position.
  • Adjusted forward push pull tube for slightly forward stick (5-6 degrees) in neutral elevator position. I also put the seat in and checked hand position and elevator travel. Both of the push pull tubes fit almost perfectly and only required small adjustments.
  • Permanently bolted forward push pull tube to bell crank.


Bell crank with aft and forward push pull tubes and pitch servo:

Forward push pull tube attached:

Sunday, January 28, 2018

Fuel pump, tunnel cover, stick adjustment, stick wiring, etc: 21 hours

The following was done over the last week:

  • Permanently installed the electric fuel pump, filter and all plumbing for fuel in the cabin. I also checked the torque on all fuel fittings in the cabin.
  • Checked the fit on the tunnel cover and found that the wire bundles don't fit behind the stock tunnel cover.
  • Modified the tunnel cover by dividing it into three pieces and fabricating a new middle piece and mount. This took a lot of time but turned out good and gives me extra room to work with.
  • I was getting ready to install the control sticks but I happened to read on the VAF forum where guys had run into interference problems with the stick and the engine controls . I had trimmed my stick tubes to clear the panel but did not have the engine controls in place. When I checked this I found that I had the same problem so I trimmed the sticks about an inch shorter.
  • Permanently installed right stick mount.
  • Wired right stick with RC servo connectors to so stick can be removed without major hassle.
  • Connected right stick wiring to stick terminals.
  • Permanently installed left stick and wired to stick terminals.
  • Did initial test of stick functions - so far all checks good.
  • Installed click bond wire tie mount in tunnel to guarantee wires clear elevator push / pull tube. Also installed click bond plate nuts for empennage fairing. The plate nuts work great. I will order more to use on the removable fiberglass empennage tips.


Fuel pump and all fuel lines in cabin installed:

Another angle:

New tunnel cover plate:

Tunnel cover modifications in progress:

Throttle could interfere with stick movement:

Trimming stick using hose clamp as guide:

Wiring right stick with RC servo connectors:

Fitting right stick wiring:

RC servo connector clips keep the connections secure:

Left stick installed and wiring connected (this will get organized):

Wire tie mount in tunnel:

Click bond nut plate curing (these are very nice!):

Sunday, January 21, 2018

Database updates and misc: 4 hours

  • Organized and cleaned up all wiring.
  • Installed final Garmin backshell for the EFII engine computer wiring
  • Updated all databases (nav data, terrain, obstacles, charts, safe taxi airport diagrams, etc.) on both G3X touch units and the GTN 650 using the Garmin one shot coupons for initial database updates.
  • Installed bulkhead fitting and vacuum hose aft of firewall for EFII dual manifold pressure sensors
  • Installed 1" split loom wiring conduit to protect the exposed wire bundles behind rudder pedals. I also secured the split conduit to the previously installed wire tie clips.

The split conduit protects the wire bundles but will also look good when the tunnel cover / heater vent is in place:


I really like the Garmin backshells:

Electronic ignition manifold pressure sensors complete:

Steel bulkhead fitting for manifold pressure:

Sunday, January 14, 2018

Wiring progress: 3 hours

  • Added the backshell to J243 connector and connected it to the GEA 24
  • Connected RPM output from right engine computer
  • Fabricated and installed a wire support near the left firewall pass through. 
  • Completed electronic ignition power wiring. (This mostly completes the wiring forward of the instrument panel until we hang the engine!)
  • Started -final- organizing wiring behind the instrument panel.


Right engine computer - wiring  cleanup started - still waiting on Garmin backshell for one connector.

Initial cleanup of wiring around left engine computer and GEA 24 engine instrumentation box:

New wire support:


Saturday, January 13, 2018

Engine related wiring: 6 hours


  • Finished running electronic ignition wires forward of the firewall.
  • Installed AN fittings and sensors for oil, fuel and manifold pressure on the firewall sensor mount.
  • Wired the above sensors to the connector for the GEA 24 engine info system
  • I went ahead and ran the wires forward of the firewall for oil temperature, fuel flow and firewall forward temperature. The firewall forward temperature is an extra probe I'm installing near the batteries just to monitor temps. It would also give you early warning of any kind of unusual temps in the engine compartment such as exhaust leaks or fire.
  • I connected both of the electronic ignitions tach output to the GEA 24 connector. The system displays the higher of the two rpms so when you are checking the ignitions you don't loose the rpm readout.
  • I also spent some time organizing the various fiberglass tips for the empennage. I will be installing them soon.


Connector ready for backshell:

Engine sensor manifold ready:

Sensor wiring:

Thursday, January 11, 2018

Wiring and avionics: 7 hours

The following items were done over several days:
  • I spoke with the Garmin G3X support rep about the problems I was having with the GDU 450 MFD left inner knob and the end result was that the unit needed to be sent in. It was under warranty so no problem. They actually have sent me a new unit and I have sent the defective one to them.
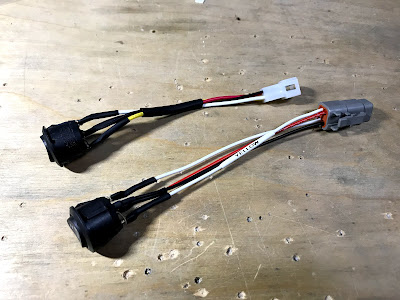
  • I installed my new seat heater switch to replace the left side one where the LED indicators did not work. One big change here was a switch to Deutsch DTM connectors. I was using mini molex 4 pin connectors before but they were marginal. The Deutsch connectors are a huge improvement - they are expensive but worth it.
  • I went ahead and changed out my other 4 pin mini molex connectors for the cabin and instrument panel lights to Deutsch DTM. The mini molex 4 pin connectors had been extremely difficult to connect. The Deutsch connectors are easy to connect and very high quality.
  • I installed the wiring for the instrument panel lights. For connectors I used the mini molex 2 pin. For connections that are not exposed to moisture and just have 2 conductors the mini molex work fine.
  • In the future for any connector with more than 2 pins or in a possible damp environment I will be using the Deutsch DTM's.
  • I started installing the wiring for the dual electronic ignition. In sorting out the supplied EFII wiring harness I decided I was not happy with the D-Sub backshells used. The screws were too long and bottomed out when attaching to the engine computers and the backshells did not have any real strain relief. I had some extra Garmin backshells so I used those for one engine computer and ordered more from Steinair for the other. The Garmin backshells are top notch.
  • I also came up with a plan to run the tubing for the manifold pressure sensors.


3/4's of the EFII electronic ignition harness in place (will stay loose until engine is hung)

One manifold pressure sensor connected (all of this wiring will be organized later!)

Deutsch DTM connectors (gray) for panel and cabin lighting (highly recommended):

Old switch vs. new switch with DTM connector (gray):


Sunday, January 7, 2018

Avionics configuration: 2 hours


  • The garage was cold but with the seat heater on it was comfortable configuring the avionics!
  • I set up the remote audio panel. I also plugged in my old (20+ years) David Clark headset and tested the pilot audio including the bluetooth connection from my iphone to listen to music and make a call - very cool!
  • I also set up the Arinc and RS-232 connections for the GTN 650. 
  • I spent some time arranging the layout and getting familiar with the G3X displays.
  • I did have one issue with the GTN 650 where constant static was audible. It was like the squelch was not set correctly. I set the squelch and sidetone according to VAF recommendations and still had the noise. More research revealed that the fluorescent / led lights I have in the garage might be the cause of the noise. Switching off the lights = no noise in the headphones. Problem solved! 
  • One negative issue I found is that the left inner knob on my smaller G3X MFD display is not working correctly. I have contacted garmin and will wait for feedback.


Audio panel phone / media page (great for cross country flights!)