Labels

Aileron (31) Avionics (72) Canopy (80) Cowl (28) Electrical (40) Elevators (36) Empennage (94) fiberglass (22) Firewall Forward (58) Flap (43) Fuel System (23) Fuel Tank (4) Fuselage (156) Horizontal Stabilizer (25) Interior (27) Landing gear (10) Paint Schemes (2) Parachute (30) prop (2) Rudder (13) Vertical Stabilizer (14) Wing (133) Wing tip (2) Wiring (18)
Showing posts with label Horizontal Stabilizer. Show all posts

Monday, May 17, 2021

More empennage, including horizontal stabilizer tips:


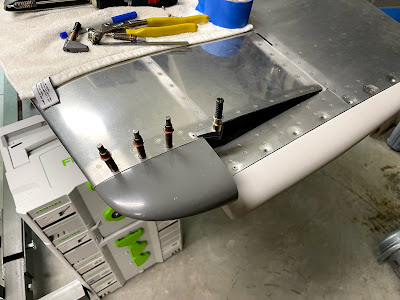
One more coat of epoxy primer on the tips. Even after this I found a few pin holes!

Getting ready to trace the foam rib to close out the horizontal stabilizer tip:

Rib after cutting and sanding a little:

Ready to fiberglass:


I decided to add some aluminum strips to the HS tips due to the edge distance on the screw holes:

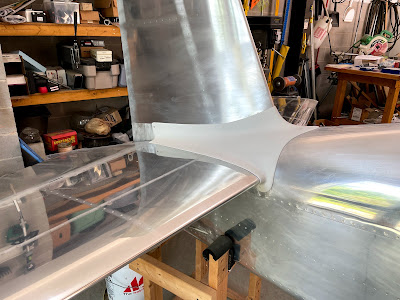
Empennage fairing combined with the metal access panel looks great:


Thursday, May 6, 2021

Empennage work:


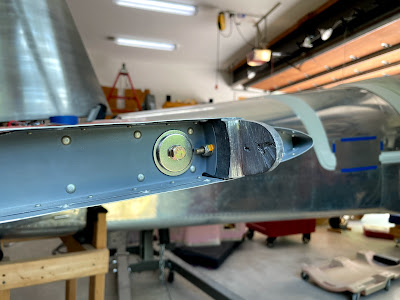
Elevators are balanced and "permanently" installed. I balanced both elevators separately then connected them and the push pull tube and torqued all bolts.

The elevator trim servo can be unplugged here to remove the elevators when the plane is painted.

I copied the elevator trim servo wiring idea from a Vans Airforce forum post. The wire remains clear through the full travel of the elevator:

Right elevator only needed a little extra weight to balance. After painting I can easily add more.

Much more weight required for the left elevator to compensate for the trim servo.

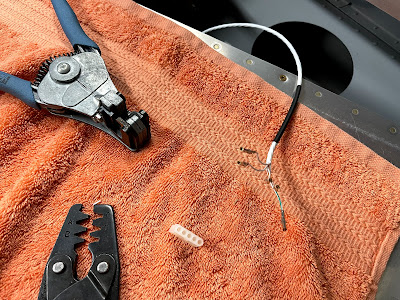
Making the trim servo plug. There is also another plug attached to the trim servo so it can be removed for maintenance without removing the elevator.

Elevator tips after some epoxy primer:

Horizontal stabilizer drilled for tips:

I cleaned up and painted the elevator horns:

I used soft rivets and attached the plate nuts directly to the fiberglass elevator tips:

A lot of filling and sanding:

Friday, March 10, 2017

"Permanently" mounted horizontal stabilizer: 2 hours


  • After a fair amount of time figuring out the best bolt / washer combination for the stabilizer I got it bolted on. Hopefully it will not have to come off again!
  • Everything was torqued with my new 1/4" digital torque wrench and torque sealed.
  • Threading the pitch trim wire through the stabilizer went quick. After the exact length is determined I will add a some anti abrasion covering and secure the wire to the wire clips.


Horizontal stabilizer with pitch trim wire:

Pitch trim and rudder lighting wires:

Friday, December 30, 2016

Finished vertical stabilizer mounting: 5 hours


  • Vertical stabilizer is now complete drilled and fitted to the fuselage and horizontal stabilizer! I still need to disassemble, deburr, clean and prime everything that needs it. After that the vertical stab connector plate will get riveted onto the vertical stab forward spar.
  • I started this process by making and adding a .063 shim to the horizontal stabilizer. This was recommended by various forum members and will especially apply to my plane because I will have a more aft cg with the ballistic parachute.
  • I then doubled checked the fit and alignment of the vertical stabilizer and drilled the connector plate to the vertical stab forward spar using the angle drill.
  • After deburring and cleaning up the connector plate I started on locating the holes for the AN4 bolts that secure the vertical stab rear spar to the fuselage and tailwheel mount.
  • Locating these holes took a long time - probably over and hour. This is essentially blind drilling with fairly close tolerances. It involved a lot of tricky measuring of the inside of the fuselage and tailwheel mount then transferring these measurements to the outside drill point. This was a case of measure several times then check measurements many more times, repeat, etc.
  • I did follow another RV builders advice of moving the upper bolt holes 1/8" inboard. That worked out great and gave me a little more comfort when drilling the holes.
  • The actual drilling and reaming of the holes went well but took a while because of the multiple layers of steel and aluminum.


Inside view of the vertical stab spar to tailwheel mount bolts:

Bolts temporarily in place ... good edge distance everywhere:

I double checked after drilling the pilot holes but did not need any adjustments:

#30 pilot holes done:

My custom F-781 connector plate drilled to the vertical stab:

Drilling in process:

Monday, December 19, 2016

Started vertical stabilizer mounting: 3 hours


  • Before starting to fit the vertical stabilizer I removed the horizontal stabilizer and deburred all the holes on the stab and the fuselage then re-attached the horizontal stab.
  • I made the vertical stabilizer attachment bracket and elevator up travel stop out of a piece of 1/8" angle. The first version turned out undersized so I made another more generously sized.
  • I located the forward attachment bracket and started researching the best way to get everything lined up.
  • While working on this I noticed that the elevator down stop on the quick build fuselage will need to be trimmed significantly to get the correct travel. I sent an email to Van's to verify.
This photo show the vertical stab attach bracket / elevator up stop. Also you can see the over sized elevator down stop under the elevator bearing.

Forward attach bracket and rear attach angle:

First draft of the attach bracket / up stop before trimming:

Sunday, December 18, 2016

Finished horizontal stabilizer mounting: 2 hours
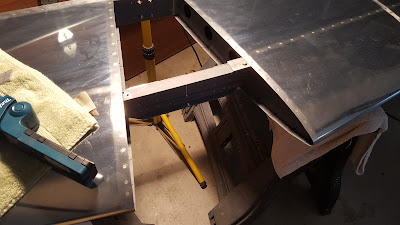

  • I spent a significant amount of time checking that the incidence of the horizontal stabilizer was correct. I did this by using two 3/16" aluminum tubes through the stab's nose ribs tooling holes. This stab is the new one incorporating the service bulletin and on my aft ribs (hs-00005) the tooling holes are not aligned with the chord line. The stab turned out perfectly level using the standard Van's shims - no adjustment required.
  • I carefully located the bottom aft attach holes first and drilled starting with a #30 bit and working up to a 3/16" reamer. I got a nice tight fit for the AN3 bolts.
  • Once the bottom holes were drilled and the stab was temporarily bolted in place I removed the clamps and drilled the upper two holes.

All aft attach holes turned out great:

Another shot looking forward with all holes drilled:

First hole done:

Everything turned out level without adjustments:

Friday, December 9, 2016

Horizontal stabilizer mounting: 10 hours

This work was done over several days:


  • Researched horizontal stabilizer mounting: plans, video and blogs.
  • Did some initial positioning of stabilizer and found that the right aft flange of the hs-00005 rib was interfering with the vertical mounting bar. To fix this I removed the rivets holding the flange to the rear spar and carefully trimmed the flange. I wedged a sacrificial piece of very thin aluminum between the rib and spar to protect the spar.
  • Made the forward 1/8" spacers for the horizontal stab
  • Triple checked and marked center lines on the aft fuselage deck where the stab mounts.
  • Also marked the longeron outline to make sure I could drill with good edge distance
  • Clamped stab in place and checked alignment with wings and fuselage. I used the technique of drilling a hole in the tape measure and using a cleco to secure it - works great for accurate solo measurements.
  • Once everything was triple checked and clamped I drilled through the stab, spacer and longeron. I bolted the left side down, rechecked measurements and drilled the right. I did have to make a spacer for the left side bolt to clear a rivet.
  • I replaced the rivets in the right rib flange and cleaned every thing up.
  • With the stab on saw horses I drilled the inboard mounting holes from the bottom up. I then bolted the stab back on the fuselage and drilled the holes through the fuselage structure with the angle drill using the stab as a guide.


Forward stab mounting holes done:

Ready to drill the inboard holes from the bottom up:

Right bolt hole done:

After trimming rib flange:

Starting to check positioning and alignment:

Spacers made from 1/8" bar:

Dad came over to help me get started on the horizontal stab:

Monday, October 15, 2012

Cleaned up and stored horizontal stabilizer and elevators: 2 hours

I spent some time going over the all surfaces with a scotchbrite pad then cleaning with mek. After that Britt helped me carry the unit into the basement for storage.

All done with the empennage until fiberglass work! Time to start on the wings!


Stored on the wall.

Monday, July 2, 2012

Finished horizontal stabilizer!: 7.5 hours

Used the squeezer for all but 4 rivets. Only had to replace one rivet on this entire section. The whole process went quickly. It's too bad you can't use the squeezer everywhere.

After everything was riveted together I went over the whole stabilizer and smoothed out a few nicks from the riveting process. I also lightly scuffed the whole surface with a fine scotchbrite pad.

The stabilizer looks great and is ready to be stored until its needed later in the build.

First major sub assembly complete!


Sunday, July 1, 2012

Riveted right skin to forward spar and attached rear spar: 7.3 hours

The right side went a lot quicker than the left. I didn't have any bad rivets on this section

After I got the rear spar temporarily attached I did some practice riveting with the pneumatic squeezer. It went well so I ended up doing some riveting on the rear spar. The squeezer is much easier and faster than the rivet gun!


Horizontal stabilizer ready to be riveted


Tight spaces


Ready for final riveting


This shows some of the structure that let's the RV-7 sustain +6/-3 g's (stronger than light planes, business jets, or airliners)