Labels

Aileron (31) Avionics (72) Canopy (80) Cowl (28) Electrical (40) Elevators (36) Empennage (94) fiberglass (22) Firewall Forward (58) Flap (43) Fuel System (23) Fuel Tank (4) Fuselage (156) Horizontal Stabilizer (25) Interior (27) Landing gear (10) Paint Schemes (2) Parachute (30) prop (2) Rudder (13) Vertical Stabilizer (14) Wing (133) Wing tip (2) Wiring (18)
Showing posts with label Wing. Show all posts

Thursday, November 16, 2023

Update for first quarter 2023:

 The plane finally made it to the hangar in February!


Rear spar bolt with proper castellated nut:

Ego battery powered light with tripod works great:

Britt showing off the hangar warming present from our friends Frost and Robin:

All wing bolts installed and torqued!

Very motivating to have the wings on! Thanks for the help from Paul and Frost!


Very happy to have the plane at the hangar! Stressful, but it is insured!


Getting ready for the move:


Monday, February 13, 2017

Wing fairings and fuel vents: 4 hours


  • Finished riveting all wing fairing and fuselage skin platenuts to both wings - this took the majority of the time
  • Started on right wing fuel vent
Left wing with fairing attached:

Working on the right wing tank:

Fuselage skin platenuts:

Friday, February 3, 2017

More wing fairing work: 5 hours


  • Countersinked both wings for plate nut rivets
  • Drilled fuel tank angle brackets for plate nuts and safety wire hole
  • Prepped and primed inside edges of wing root where plate nuts will mount and wing skin that will be covered by fuselage skin
  • Installed fuel tank bracket plate nuts
  • Started installing wing fairing plate nuts - completed left wing fuel tank plate nuts


Left wing fuel tank plate nuts complete:

Getting ready to prime wing root:

Drilling fuel tank angle bracket for plate nut:

Thursday, February 2, 2017

Wing fairing work: 3 hours

  • Finished drilling right wing for wing fairing plate nuts
  • Deburred all holes for right wing fairing
  • Edge finished and edge rolled wing fairing and fuselage to wing skin
  • Used pneumatic squeezer to flatten some fluting for better platenut mounting
  • Used pneumatic squeezer to dimple wing farings and fuselage skin for #8 screws
  • I ground down the female dimple die to clear the wing rib and fuel tank edges then dimpled all of both wing roots
  • I countersunk the wing for #8 screws in the area of the wing walk doubler - I used a new single flute countersink from Cleaveland Tool - it worked great - no chattering 

Countersinks turned out great - used the dimpled scrap to check fit

Dimpled fuselage to wing skin:

Fuel tank dimples:

Squeezer with dies (notice cut down die):

Wednesday, February 1, 2017

Wing root fairing work: 3.5 hours

  • Drilled / reamed left and right wing fairings and fuselage to wing skin to final size (#19)
  • Edge finished and edge rolled left wing fairing and left fuselage to wing skin
  • Removed excess fuel tank sealant from left fuel tank for platenuts
  • Drilled all of left wing and half of right wing for fairing platenuts

Burning a lot of time on these fairings:


Tuesday, January 31, 2017

Wing removal and misc: 2 hours

  • Finished trimming right wing fairing
  • Prepped wings for removal including: removed and stored flaps, removed rear spar bolts, removed left fuel line and organized shop.
  • Britt and I removed wings and put them on sawhorses to mount wing fairing plate nuts and fabricate fuel vent lines prior to returning wings to storage.


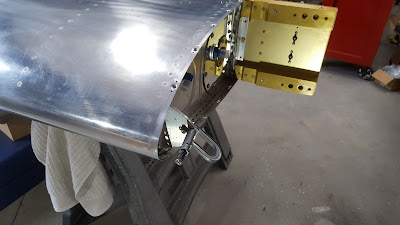
Wings detached:

Wings on sawhorses to finish fairings:

Flaps removed, prep for wing removal:

Monday, January 30, 2017

Right wing root fairing: 4 hours


  • Drilled wing fairing to wing - I spent a fair amount of time pre bending the fairing to improve fit
  • Trimmed wing fairing for 1/8" gap - this took the longest amount of time, with a lot of on and off. I have a tiny bit more trimming to do and it will be finished.
Drilled to fuel tank leading edge:


Saturday, January 14, 2017

Finished fitting left wing root fairing, started on right side: 3.5 hours

  • Match drilled the new wing fairing part to the original part
  • Put the new fairing in place then used a washer to mark a 1/8" line from the fuselage
  • Trimmed fairing to fit fuselage ...  used the shears, files, dremel tool, sandpaper, emery paper etc. ... a lot of on and off to check progress.
  • Drilled and reamed right side fuselage skin to wing underside
  • Started initial fitting for right wing root fairing

Starting on right wing fairing:

Match drilling new left wing fairing:

Thursday, January 12, 2017

Right flap fitting done, wing root fairing v2 started: 5 hours

  • Made hinge pins for right flap
  • Traced right flap actuator opening
  • Progressively trimmed right flap upper skin to fit. Also put an initial bend in the lower flap skin edge.
  • Cut out flap actuator opening
  • The right flap did not require any clearance hole but I will be converting a few rivets on the flap to flush for clearance.
  • Tested flap motor with both flaps temporarily connected - works great.
  • Started on second version of left wing root fairing. I will be shooting for a 1/8" gap based on VAF member recommendations.


Fitting the new left wing fairing:

Right flap fitted:

 Trimming right flap skin edge:

Working on right flap hinge pins:

Tuesday, January 3, 2017

Vertical stab prime and left wing fairing: 3 hours

  • I took advantage of unusually warm temperatures to prime the vertical stabilizer connector plate and touch up various spots on the vertical stabilizer itself.
  • I spent a fair amount of time fitting the left wing root fairing. Trimming it with the shears worked well.


Trimming the left wing fairing with shears:

Vertical stab priming touch up:

Monday, January 2, 2017

Started wing root fairings & misc: 4 hours

  • Temporarily installed the cockpit fuel valve then marked the right side fuel line for where the flare needs to be located so when the wings come off I can put on the fuel line fitting.
  • I then started working on the wing root fairings. The left side started out well but unfortunately I let the angle drill move while match drilling a hole and the first fairing part was damaged.
  • I ordered a new part from Vans (part cost $18, shipping probably $50!) and used the other fairing piece to continue work on the left side.
  • I got the left fairing drilled to the wing and fuel tank then opened up the holes on the fuselage to wing skin underneath for #8 screws.
  • Lastly I marked the fairing for a 3/16" gap for the rubber weatherstripping

Marking the fairing with a cut off piece of 3/16" thick angle:

Left wing fairing drilled:

Spent a fair amount of time down here:

Starting on the first (botched) fairing:

Right fuel line will be trimmed and flared after the wings come off:

Sunday, January 1, 2017

More wing fit related work: 3 hours

  • Fitted the right wing fuel tank attach bracket
  • Drilled the bracket on the fuel tank for an AN4 bolt
  • The majority of the time was spent working out the connecting fuel line for the left wing tank to the fuselage. The left wing tank has a more complicated fuel line connection because it is the aerobatic tank and the fuel port is in the leading edge of the tank.
  • I made a rough, hand bent piece of tubing as a trial run then used the tubing bender to make the final. The fit has to be exact so it took a while to get it dialed in.
  • I had not made any fuel lines in a while so I practiced flaring the tube ends on some scrap.
  • I carefully polished the ends of the fuel tubing then made my flares. Everything turned out great and fit well.

Checking the fit for the finished fuel line for the left tank:

Fuel line turned out nice:
  
Making practice flares:

Checking the initial fit:

Right wing fuel tank bracket done:

Saturday, December 31, 2016

Misc. wing fit work: 2 hours

  • I got under the wings and drilled the fuselage skin to the wing using a #40 hole finder. These holes will get enlarged for plate nuts.
  • Fitted the left fuel tank bracket. The plans recommend a 5 degree bend but in my case the left bracket required only a very slight bend to fit.
  • Drilled bracket to fuel tank. I used a piece of brass tubing for a drill bushing then enlarged and reamed the hole. 
  • The fuel tank bracket is designed to let the fuel tank separate from the fuselage without rupturing in the event of a crash.

Left fuel tank bracket fitted and drilled:


Bending bracket:

Using the hole finder underneath the wings / fuselage: