Labels

Monday, February 27, 2017

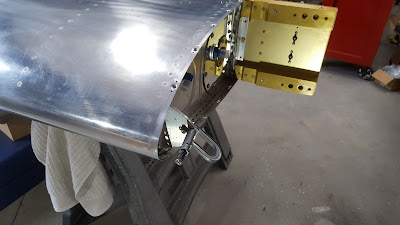
Drilled elevators for main bearing: 2.5 hours

  • The elevator horns had to be re-drilled for the main bearing bolt due to the new horizontal stabilizer. I had the old holes in the elevator horns welded closed and ground flat.
  • I made a drill bushing with 2 nesting pieces of tubing
  • I adjusted rod end bearings on both elevators for correct fit
  • The holes were drilled using the bearing as a guide then enlarged and reamed to final size

Drilling right elevator horn:

Wednesday, February 15, 2017

"Rocket" style fuel vents complete: 9 hours

This work was done over two days:


  • I went with the same style of fuel vents used on the Rocket (RV modified with larger engine etc.)
  • The standard Vans vent arrangement have more complicated plumbing and run through the cockpit. The rocket vents are all contained in the wing root.
  • I added a mounting tab and an extra platenut then cut out the wing root fairing so the fairing can be removed with out having to disconnect the vent line.
  • I'm using JD Air's streamlined fuel vents and I would recommend them.
  • My vents are in slightly different locations on each side. The left side was more complicated due to having to fit in with the aerobatic fuel line arrangement.
  • The small tubing was easy to work with. I used some 4" PVC pipe as a form for the coils.
  • I also spent some time organizing the shop because we will be moving the wings back to storage for a while.


Locating the left wing vent fairing:

Tracing the vent fairing to cut out the wing fairing:

Locating the right wing vent fairing:

Left wing mounting tab in place:

Flaring the left vent tubing:

Left wing vent complete:

Right wing fairing vent cut out:

Right fuel vent - cut out is slightly oversize to get fairing on and off:

Right wing vent complete:

Monday, February 13, 2017

Wing fairings and fuel vents: 4 hours


  • Finished riveting all wing fairing and fuselage skin platenuts to both wings - this took the majority of the time
  • Started on right wing fuel vent
Left wing with fairing attached:

Working on the right wing tank:

Fuselage skin platenuts:

Friday, February 3, 2017

More wing fairing work: 5 hours


  • Countersinked both wings for plate nut rivets
  • Drilled fuel tank angle brackets for plate nuts and safety wire hole
  • Prepped and primed inside edges of wing root where plate nuts will mount and wing skin that will be covered by fuselage skin
  • Installed fuel tank bracket plate nuts
  • Started installing wing fairing plate nuts - completed left wing fuel tank plate nuts


Left wing fuel tank plate nuts complete:

Getting ready to prime wing root:

Drilling fuel tank angle bracket for plate nut:

Thursday, February 2, 2017

Wing fairing work: 3 hours

  • Finished drilling right wing for wing fairing plate nuts
  • Deburred all holes for right wing fairing
  • Edge finished and edge rolled wing fairing and fuselage to wing skin
  • Used pneumatic squeezer to flatten some fluting for better platenut mounting
  • Used pneumatic squeezer to dimple wing farings and fuselage skin for #8 screws
  • I ground down the female dimple die to clear the wing rib and fuel tank edges then dimpled all of both wing roots
  • I countersunk the wing for #8 screws in the area of the wing walk doubler - I used a new single flute countersink from Cleaveland Tool - it worked great - no chattering 

Countersinks turned out great - used the dimpled scrap to check fit

Dimpled fuselage to wing skin:

Fuel tank dimples:

Squeezer with dies (notice cut down die):

Wednesday, February 1, 2017

Wing root fairing work: 3.5 hours

  • Drilled / reamed left and right wing fairings and fuselage to wing skin to final size (#19)
  • Edge finished and edge rolled left wing fairing and left fuselage to wing skin
  • Removed excess fuel tank sealant from left fuel tank for platenuts
  • Drilled all of left wing and half of right wing for fairing platenuts

Burning a lot of time on these fairings: