Labels

Sunday, September 28, 2014

Misc wiring: 2 hours


  • Removed Clickbond fixtures
  • Cleaned stock adhesive off of led light strip segments. (The strips come in a roll with a weak adhesive that is good for nothing.)
  • Installed led wire connectors - I used the snap on type connectors and the worked very well. I also went for extra security by using a drop of CA (super glue) to bond each connector shut. 
Interior LED light strips with connectors:

Saturday, September 27, 2014

Wiring work and more paint removal: 6 hours


  • Riveted head set jack plates in place
  • Crimped on coax fitting to ADSB antenna cable. (I watched a very helpful Steinair.com video on this subject and did a practice piece first. I also checked my work with a multimeter.)
  • Installed 14 Clickbond adhesive wire tie clips
  • Britt put in a bunch of time stripping paint from interior panels

ADSB antenna cable attached:

Clickbond wire tie clips curing (the large clear plastic pieces will be removed):

Friday, September 26, 2014

Paint removal and head set jack work: 2 hours


  • Continued working on stripping paint from various interior parts
  • Made some small anti rotation plates for my Bose headset jacks
Fitting the plate:


Thursday, September 25, 2014

Interior arrived! - Changing paint color!: 2 hours

I received my Aviator heated seats and Sportsman side panels from Classic Aero Design. Unfortunately Fedex damaged the right seat back in shipping so it has to go back to Classic Aero for repair.

The damage was a cut in the side of the seat back that was about an inch long but the seats were expensive and I want them perfect ... at least to start out with.

Other than the shipping damage everything from Classic Aero looks great. The quality is top notch.

Once I laid out and inspected all the pieces I realized that I was not happy with the Majik Ford Tractor Gray color and my interior colors. After a lot of thought I decided I would have to remove the paint from the pieces I had done.

I went ahead and got started on the paint removal. Fun!

I had some help with the inspection:

This is a good color comparison. Ford Tractor Gray on left. The piece on the right is the primer I use. I think it looks much better than the Tractor Gray.

Seat damage  (thanks to Fedex for the hassle)


Friday, September 19, 2014

Organized electrical supplies, cockpit lighting work: 2 hours


  • Inventoried and organized switches and electrical supplies
  • Worked on led strips for cockpit and cabin lighting
A lot of switches:

Testing led strip lighting:

I plan on using 3m double sided tape (used for holding on automotive trim) to hold the led's in place. I stuck an extra led strip to a painted piece of scrap to see how the tape holds up over time.

Wednesday, September 17, 2014

Painted baggage wall panels: 1 hour


  • Finished prepping baggage wall panels
  • Painted baggage wall panels with Majik spray enamel in Ford Tractor Gray
Panels drying:

Tuesday, September 16, 2014

Flap sensor and baggage wall work: 3.6 hours


  • I attached a small electric connector (from an RC servo) to the flap position sensor. 
  • Fabricated the shoulder harness cable wear blocks
  • Drilled and installed plate nuts for wear blocks and baggage wall
  • Prepped baggage wall panels for painting
Connectors for flap position sensor:

Working on harness cable wear blocks:

Monday, September 15, 2014

Baggage wall & misc: 1 hour


  • Cut up some foam insulation for the aft side of the baggage wall to make the cockpit less drafty.
  • I was checking out how the electric boost pump mount will fit in and I went ahead and started deburring it.


Sunday, September 14, 2014

Baggage bulkhead work: 5 hours

  • Worked on aft baggage bulkhead
  • Sliding canopy research
  • Made notch for canopy slide support in upper baggage bulkhead
  • Cleaned up notches in upper baggage bulkhead for shoulder harness cables 
  • Made washers for harness cable wear blocks
  • Removed rivet and enlarged hole in bulkhead for canopy slide support
Baggage bulkhead:

Harness cable notches:

Saturday, September 13, 2014

Wiring and other miscellaneous tasks: 8.8 hours

I got a lot of small tasks done today:

I worked on the panel mockup to lay out actual switch functions and added representations for lighting controls. There are a lot of switches (20+).

I tested my interior light led strips. The cockpit should be very well illuminated for night operations. The leds use very little power and have a very long life.

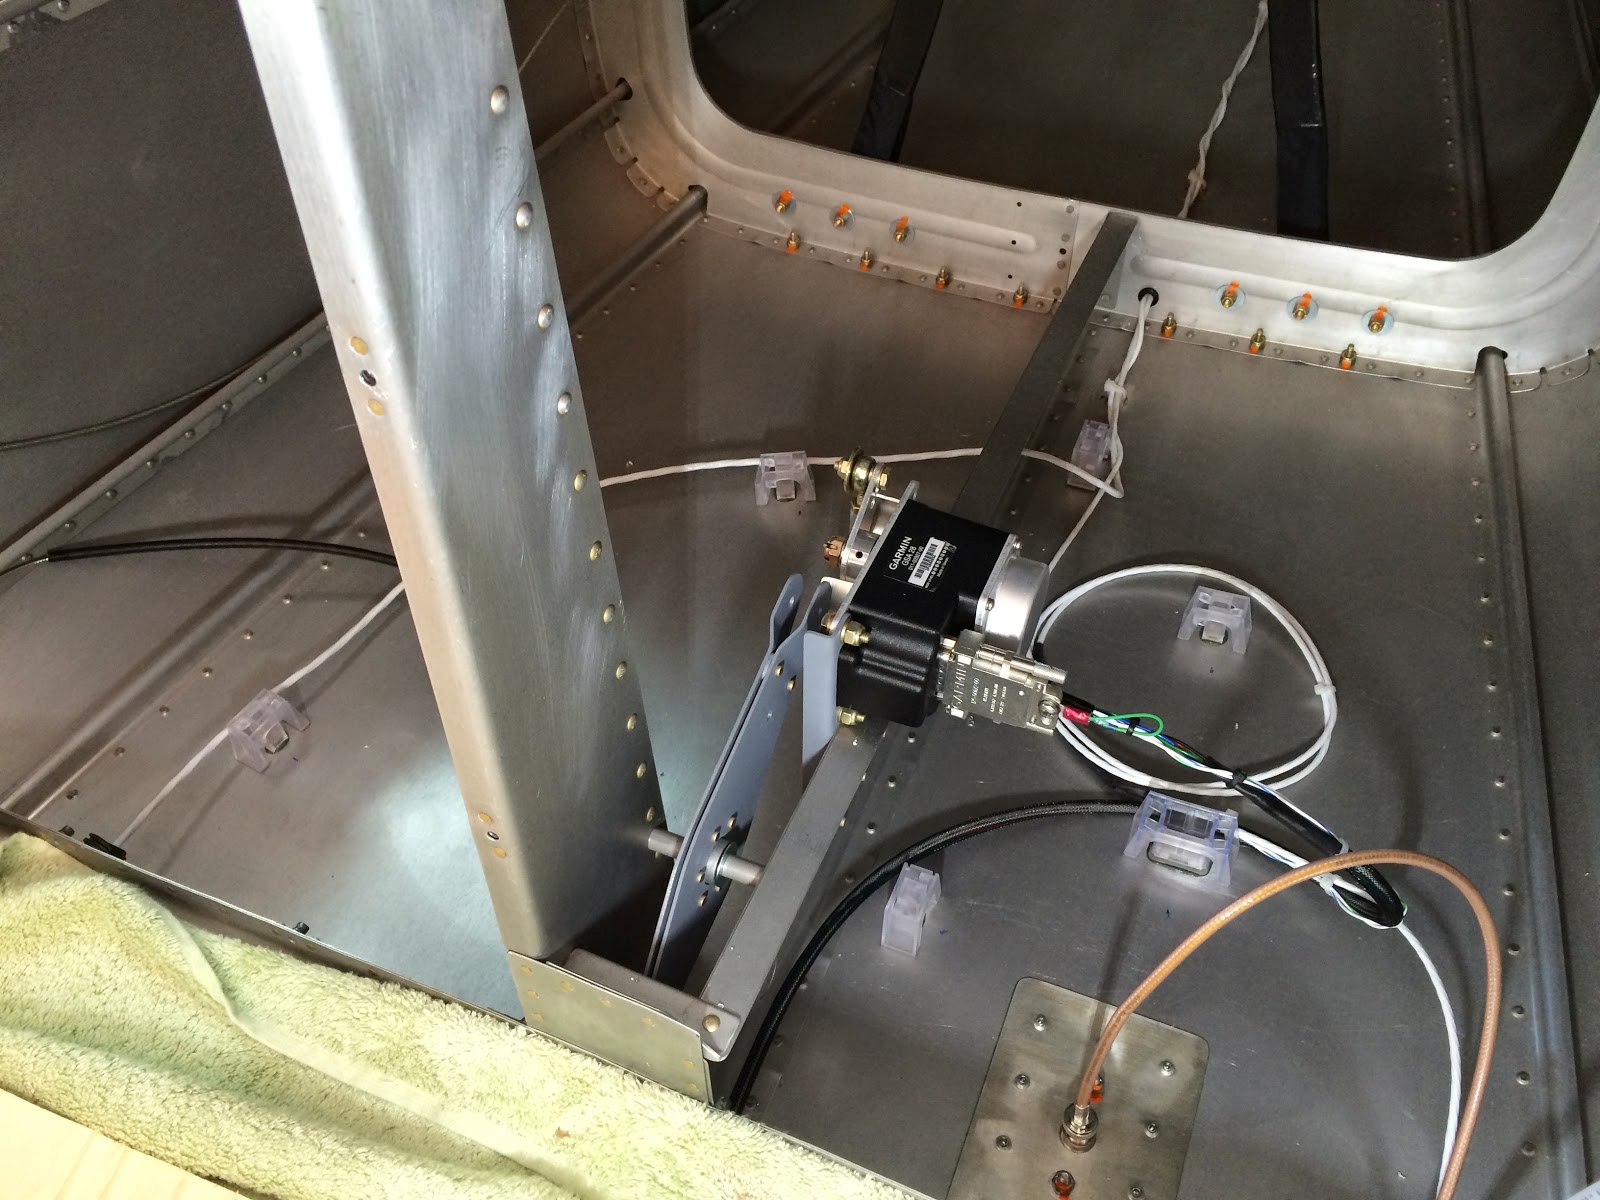
I ran the autopilot pitch servo wire bundle from the main spar back to the servo. I then assembled the servo dsub back shell connector. This wire harness was pre-made by Steinair but the individual pins still have to be inserted in the proper place in the connector. I also connected pitch trim servo to the cable for the auto pilot servo. In the Garmin system the pitch trim servo is controlled by the autopilot pitch servo.

I also ran the pitot static tubing, tail nav / strobe light wiring and adsb antenna cable through the fuselage conduit.

Finally I spent some time working out the best places to locate the led strips in the cockpit and how to run the wires.

Latest instrument panel mockup:

Putting pins in the ap pitch servo dsub connector:

Pitch servo connected:


LED light strip test:


Wednesday, September 10, 2014

Instrument panel work: 2 hours

My brother Paul was in town and we took some time to work on the instrument panel. This involved temporarily fitting the forward fuselage structure for the instrument panel. We then used color prints of the Garmin avionics to work on a good layout for the panel. Squares of blue tape were used to represent switch positions.

It was definitely nice to have another person to bounce ideas off of for the panel layout.

I'm very happy with the results. Now I can start putting the design into the front panel express software.

Initial panel layout with 10" G3X touch, 7" G3X touch and GTN 650:

Paul checking the ergonomics:

I believe the seats from Classic Aero will be slightly more comfortable.

Panel setup with room for 16 switches: