Labels

Monday, December 16, 2019

Trimmed and aligned gear leg fairings


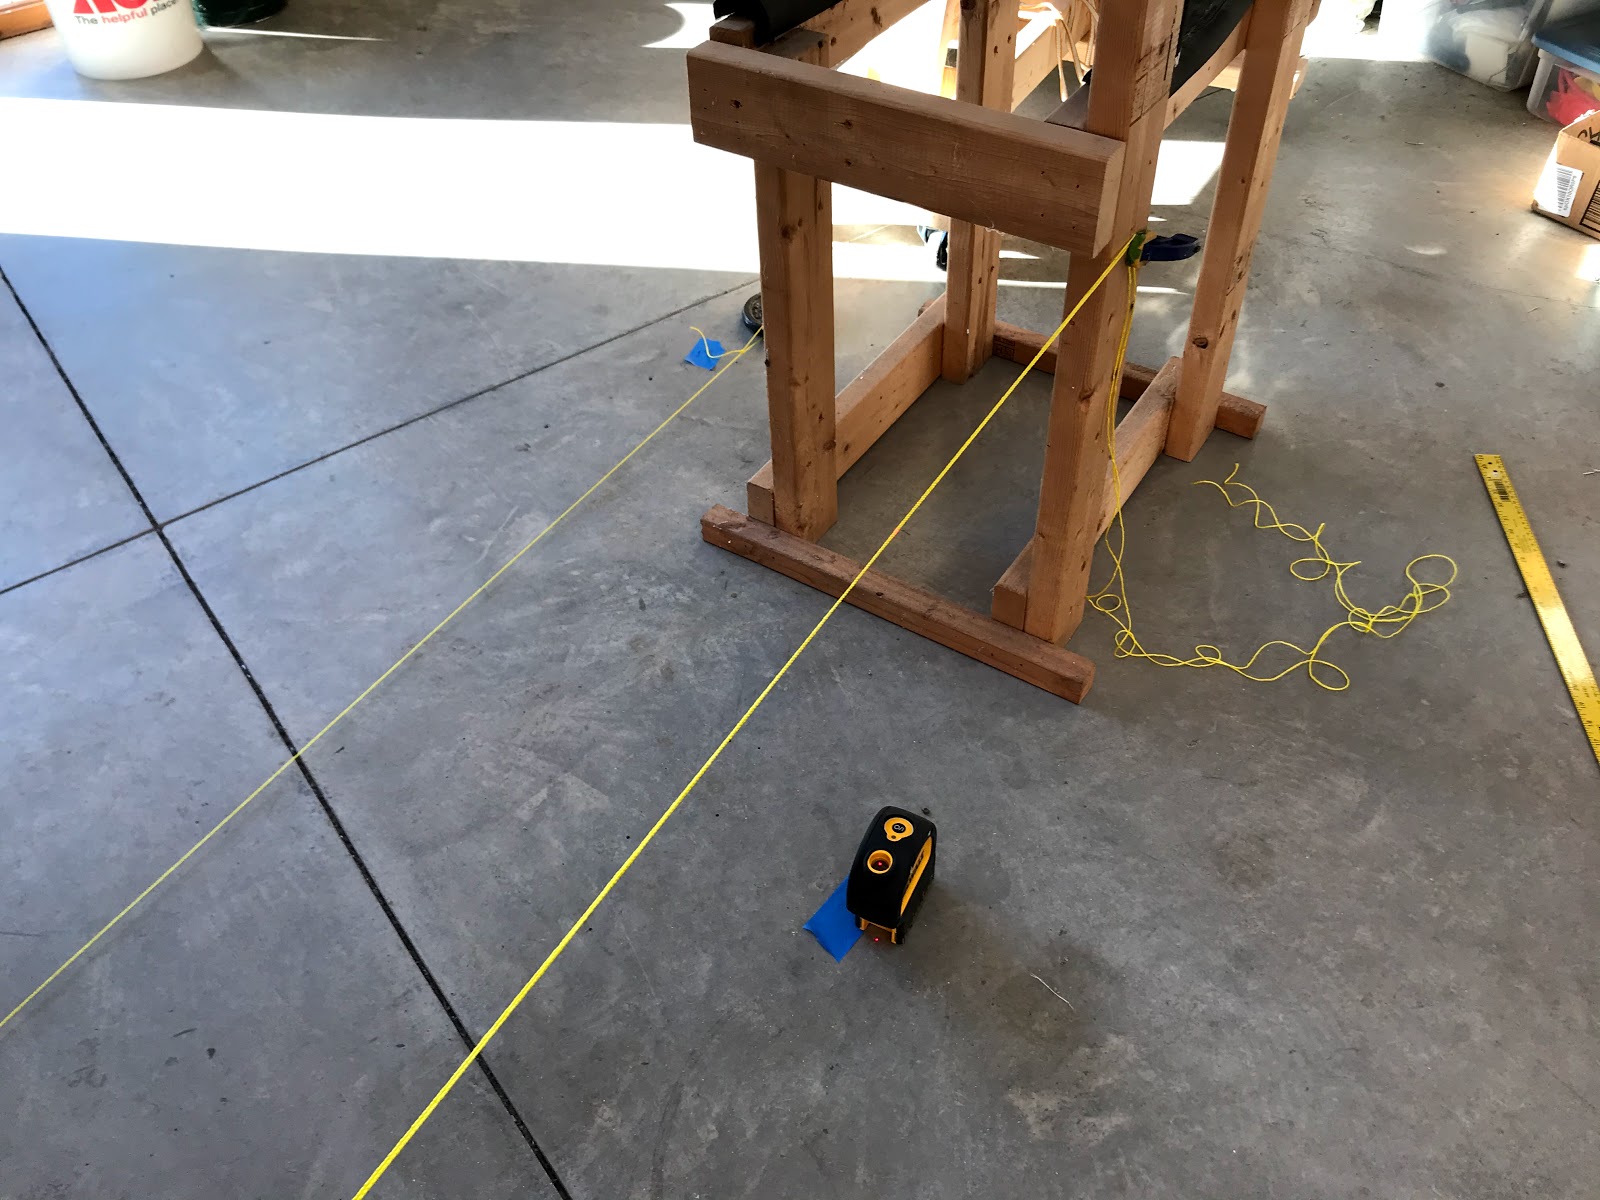
Once I trimmed the trailing edge of the gear leg fairings I put them on the landing gear and used the engine hoist (attached to the engine mount) and the tail lift to level the fuselage.  

I used my very handy laser plumb bob to mark the fuselage center line on the floor. I then marked a reference point on the gear, made a parallel mark on the floor and put a string around the fairing. With that in place I could move the fairing to line it up with the aircraft center line.

The laser plumb bob made the whole process fairly easy:


Saturday, December 14, 2019

Wingtip lights, landing gear leg fairings and parachute knockout panel


I finished a new knockout panel for the BRS parachute. I used the original panel as a template and made a new one that exactly fits my installation.

Knockout panel temporarily in place (after the parachute and rocket are installed the knockout panel is secured in place with silicone so it will easily depart the aircraft if the rocket is fired.):

Right landing gear leg fairing hinge glued with G-flex and riveted:

Drilling the hinge to the outboard side of the right landing gear leg fairing:

I sanded down the filler I had put around the recess where the nav / strobe light lenses mount. I put some protective wrap over the lenses and stored the wingtips for now.

I reinforced the cut out area that gets clamped to the landing gear leg with one layer of fiberglass tape and G-flex epoxy.

Left fairing hinge glued and riveted:

Drilling the left fairing:

Drilling the first hinge half:


Saturday, December 7, 2019

Primed BRS fairing, more wingtips, and started on gear leg fairings

I wasn't happy with the finish on the parachute fairings from the Ekopoxy so I sanded it down and re-coated with Eastwood Aerospray  2k gray epoxy primer - much nicer finish!

Just after painting:

Turned out great, looks nice with all the tape removed:


Working on platenuts to hold wingtip lens:

Wired Deutsch DTM connectors to nav / strobe lights. I also enlarged the hole in the wingtip for these connectors.

Nav / strobe lights pictured and I also wired the tail nav / strobe.

Paper template on a landing gear leg fairing:

Friday, November 22, 2019

Parachute fairing, wingtip lights and a little cowl work


BRS parachute harness fairing after coat of Ekopoxy:

Parachute fairing ready for primer:

Working on filling the vast number of pinholes in the top cowling:

Trimming the wingtip lens to fit:

Testing Aeroled nav light - super bright!


Both lights mounted:

One lens fitted:

Thursday, August 29, 2019

Cowl and BRS parachute fairings


Initial micro fill around oil door and added section of top cowling. I used another builders method of two wraps of silicone tape around the oil door to make space.

Bonding on the strike plates for the oil door latches with g-flex epoxy:

Hartwell latches riveted to oil door:

I used a mixture of flox and cabosil thicked epoxy to even out the mount of the very straight cowl flap in the very curvy cowl:

BRS parachute harness fairing after initial sanding of filler (g-flex epoxy with micro balloons):

BRS parachute fairing with E6000 adhesive curing. I also used a good number of flush 1/8 pull rivets.

Fairings curing before filler. (This job was more involved than I expected and Britt's help was crucial.)

Getting ready to glue / rivet fairings on. Harness held in place with very sticky double sided tape:

Another prep shot:


I primed the BRS fairings with Stewart ekopoxy. This was good practice but they have been sanded so much that I will have to prime them again on the plane.

Initial cut out for cowl flap:

Laying out the initial cut:

Sunday, July 21, 2019

Cowling work, oil temperature control, BRS parachute fairings and more...

Lower cowling after doing initial sanding of the new flanges around the inlets:

Lower cowling just after separation from the top cowl:

Layups in place on the inside of the cowlings:

Getting ready to layup the new flanges (where tape is):

BRS parachute harness fairings temporarily installed with clecos. Next step is more sanding then priming. Planning on attaching with G-flex epoxy.

Right side BRS fairings:

These fairings took a long time to line up. I could not have done it with out the help of my brother!
 

Tail fairing looking good after primer:

Oil door drilled for latches:

Coated tail fairing with a thin layer of epoxy to fill pin holes:

Cowling after epoxy micro mixture has cured. This gives the cowling a consistent gap with the spinner.


New oil temperature manual control. I'm happy to have switched to this from the RC servo. This method should never give a problem.

Spinner gap micro epoxy curing under mdf  to set gap with spinner: